
March 04 2025
How to add SX.ORG Proxy in ixBrowser (+promo code for free GB)
What is SX.ORG?
SX.ORG is a fresh proxy market with 12M+ clean IP-addresses of all types with 200+ GEOs.All proxies from high-quality, reliable partners are available in one place, along with our own pool of over 12 million clean IP addresses.
Enjoy flexible configuration that lets you tailor proxies for any task, with coverage across 200+ geo-locations, and targeted configuration down to the ASN level.
Benefits for Users:
1.All types of proxies: Mobile, Residential, Corporate;
2.Users pay only for the traffic they use – pay as you go;
3.Regular updates to the IP pool;
4.No limit on port creation;
5.Support for HTTP and SOCKS5 protocols;
6.Flexible proxy architecture – configure proxies for any GEO;
7.Detailed open API;
8.Uptime: 99.78%;
9.24/7 customer support;
!!! Get GB for free with the promo code IxBro !!!
The promo code is activated after registration on our website
SX.ORG
Where to enter the promo code:
- Go to your profile
- On the left side find the “Get Bonus” button
- Connect Telegram
- In tg-bot enter the promo code IxBro in the form
How to set up SX.ORG proxies with ixBrowser?
Step 1: Register an account in
SX.ORG
Step 2: Verify your email
In order to create a proxy port, go to the “Create New Port” tab.
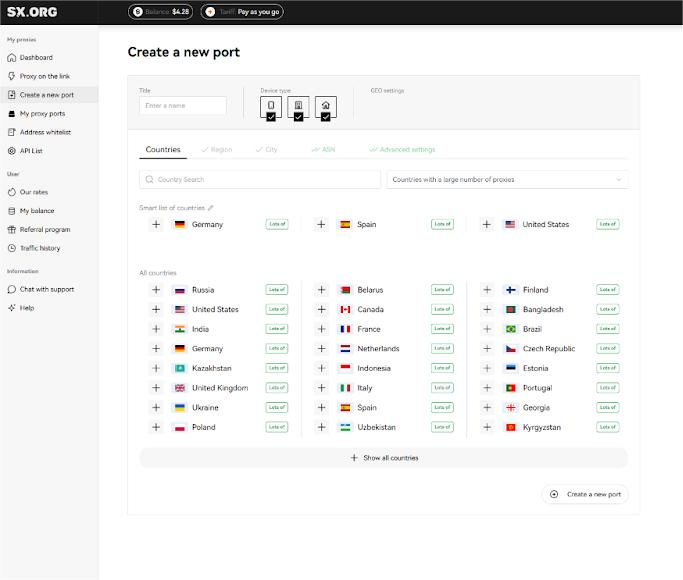
On the first step of creating a proxy, you will be asked to select a country and a proxy type.
Above the country selection field you can set the IP type: mobile, corporate or residential (1). Note that all 3 types are selected by default, but for the most stable performance, we recommend selecting only one of those types.

You can find the country you are interested in in the “Country Search” field (2). Just start filling out the name and the dynamic filter will display the most similar results.
After selecting a country, next you can select a region and a city you are interested in. If you don't know in which region the city of your choice is located, worry not, when selecting the city, the region will be selected automatically.
Next you can set the ASN (Internet Service Provider). We recommend leaving this option by default.
At the last step you can choose a name for your proxy, quantity, rotation type and authorization type.
Next, you can choose a type of IP behavior (3).

“Keep connection” (default) - if the current IP stops operating, the system will replace it with the closest similar IP of the same subnet or the same ASN.
“Break Connection” - if the IP disconnects, the connection will be halted until the current IP becomes online again.
“Rotate” - with this type of behavior, the IP address is being changed with each request.
And the last step is to select the authorization type (4):
“Login and password authorization only” (default) - the proxy is being authorized by login and password only. Note: IP addresses of devices added to your whitelist cannot be used with this type of proxy.
“Authorization by whitelist or authorization by login and password” - this type of proxy allows you to establish connection via IP:PORT credentials of the proxy, without specifying login and password, as long as the IP address of your device is provided in the whitelist.
*Please note, this option requires a fee.
The cost of creating a port of this type is $0.01. Also $0.01 for each port of this type on your account will be deducted from your balance once a day.
Upon setting all the preferences, click “Create Port”, and the proxy generation will start taking you to the main screen of the “My Proxy Ports” page
Click Create a new port (5)
Congratulations, you have created a port!
Now you need to select the proxy type (6)
Next, copy the proxy URL, login and password (7)

How to setup SX Proxy with ixBrowser?
Step 1: register an account, download and log in to
ixBrowser

Click “Create Profile”(1), select platform and group, enter profile title(2), and click “Next Step” (3)

in Proxy Configuration page, choose the proxy method to “Custom” (4), and choose proxy type to Socks5 (5)

Copied from the website SX.org we insert the data into ixBrowser (6)

Click proxy detection (7), once is passed, you can click “Create” button (8) to finish the profile creation

In proxy list, find the profile you just created, click “Open” button, and you can start using it!

February 20 2025
How to configure Cliproxy in ixBrowser fingerprint browser (如何在ixBrowser指纹浏览器中配置Cliproxy代理)
ixBrowser is a powerful, permanently free anti-detect browser suitable for multi-account management in various scenarios.
ixBrowser是一款功能强大、永久免费的指纹浏览器,适用于多种场景下的多账号管理。
Through its diverse fingerprint configurations, window transfer function, rich plug-in support, team collaboration and permission management functions, users can efficiently manage multiple accounts and ensure that each account has an independent and secure network environment.
通过其多样化的指纹配置、窗口转移功能、丰富的插件支持以及团队协作与权限管理等功能,用户可以高效地管理多个账号,并确保每个账号都有独立且安全的网络环境。
1.Log in to Cliproxy official website,Insert link: 【
1.登录Cliproxy官网插入链接:【

2.Please select the IP type you want to extract on the left (here we take Socks5 as an example). Then select your target country, region and street information in [Proxy pools], click [Search] to get your target IP list, and finally select a suitable IP and click [Connect].

3.Click [Copy] in [Usage Lists] to obtain the host, port, account, and password information of this IP.

4.Open the ixBrowser fingerprint browser and log in; create a new window to complete the pre-configuration conditions of the proxy. Please click the operations in order, select the platform and group information that suits you (if not specified, please select your business platform and remarks information in order), and finally click [Proxy Configuration].

5.Enter the proxy settings, select the proxy type as Socks5, and paste the IP data you copied into [Proxy Host]. ixBrowser will automatically divide the columns and place your IP data in the corresponding positions. Click [Proxy Detection] to check whether your IP information is true and reliable (green IP information means no problem). Finally, click [Create] in the lower right corner.
5.进入代理设置,选择代理类型为Socks5,把您复制的IP数据信息粘贴在【代理主机】内。ixBrowser会自动分栏,把您的IP数据一一放置在对应位置。点击【代理检测】检查你的IP信息是否真实可靠(绿色IP信息代表没问题)。最后点击右下角的【立即创建】。

6.Click [Open] to enter the browser window of the currently configured IP.
7.You can see that the IP change is successful and the configuration is complete. The quality of this IP is an extremely pure family residential IP resource.
7.可以看到IP更改成功,配置完成。此条IP的质量是极度纯净的家庭住宅IP资源。

Experience now and get a free proxy - Cliproxy
Insert link: 【
ixBrowser是一款功能强大、永久免费的指纹浏览器,适用于多种场景下的多账号管理。
Through its diverse fingerprint configurations, window transfer function, rich plug-in support, team collaboration and permission management functions, users can efficiently manage multiple accounts and ensure that each account has an independent and secure network environment.
通过其多样化的指纹配置、窗口转移功能、丰富的插件支持以及团队协作与权限管理等功能,用户可以高效地管理多个账号,并确保每个账号都有独立且安全的网络环境。
1.Log in to Cliproxy official website,Insert link: 【
https://cliproxy.com/?kwd=ty-ixbrowser
】. If you don’t have an account, please complete the registration process.1.登录Cliproxy官网插入链接:【
https://cliproxy.com/?kwd=ty-ixbrowser
】,如果没有账号,请完成注册流程。
2.Please select the IP type you want to extract on the left (here we take Socks5 as an example). Then select your target country, region and street information in [Proxy pools], click [Search] to get your target IP list, and finally select a suitable IP and click [Connect].
2.请在左侧选择需要提取的IP类型(这里以Socks5为例)。然后在【代理池】中选择您的目标国家地区街道信息,点击【查询】,得到你的目标IP列表,最后选择1个合适的IP点击【提取】。

3.Click [Copy] in [Usage Lists] to obtain the host, port, account, and password information of this IP.
3.在【使用列表】内点击【复制】得到这条IP的主机、端口、账号、密码信息。

4.Open the ixBrowser fingerprint browser and log in; create a new window to complete the pre-configuration conditions of the proxy. Please click the operations in order, select the platform and group information that suits you (if not specified, please select your business platform and remarks information in order), and finally click [Proxy Configuration].
4.打开ixBrowser指纹浏览器,并且登录进入;创建1个新的窗口来完成代理的前置配置条件,请按照顺序点击操作,选择合适你的平台和分组等信息(不指定,请按照顺序选择你的业务平台和备注信息),最后点击【代理设置】。

5.Enter the proxy settings, select the proxy type as Socks5, and paste the IP data you copied into [Proxy Host]. ixBrowser will automatically divide the columns and place your IP data in the corresponding positions. Click [Proxy Detection] to check whether your IP information is true and reliable (green IP information means no problem). Finally, click [Create] in the lower right corner.
5.进入代理设置,选择代理类型为Socks5,把您复制的IP数据信息粘贴在【代理主机】内。ixBrowser会自动分栏,把您的IP数据一一放置在对应位置。点击【代理检测】检查你的IP信息是否真实可靠(绿色IP信息代表没问题)。最后点击右下角的【立即创建】。

6.Click [Open] to enter the browser window of the currently configured IP.
6.点击【打开】,进入当前配置IP的浏览器窗口。


7.You can see that the IP change is successful and the configuration is complete. The quality of this IP is an extremely pure family residential IP resource.
7.可以看到IP更改成功,配置完成。此条IP的质量是极度纯净的家庭住宅IP资源。

Experience now and get a free proxy - Cliproxy
Insert link: 【
https://cliproxy.com/?kwd=ty-ixbrowser
】
February 20 2025
How to set up 9Proxy with ixBrowser
What is
9Proxy offers a premium proxy service with over 20 million clean, non-blacklisted residential IPs from more than 90 countries, ensuring fast, secure, and highly anonymous browsing via HTTP/HTTPS and SOCKS5. Our unique pool offers unbeatable prices starting at $0.025/IP, alongside a distinctive proxy replacement policy and a "Today List" feature for optimal utility. Complemented by round-the-clock technical support, 9Proxy is the go-to solution for affordable and reliable proxy needs.
How to set up 9Proxy with ixBrowser
Step 1: Download, launch the 9Proxy application and log in to your account.
Step 2: You fill in important information fields such as Country, State, ... and click on the magnifying glass icon next to search.

Step 3: Right click on the proxy you selected from the list, select “Port Forwarding To Proxy”, select the Port number (e.g. 60000) and click “Port Forwarding List” for more details about the proxy you just selected.

Step 4: Copy the proxy to prepare for installation.

Step 5: Launch the ixBrowser and log in to your account.
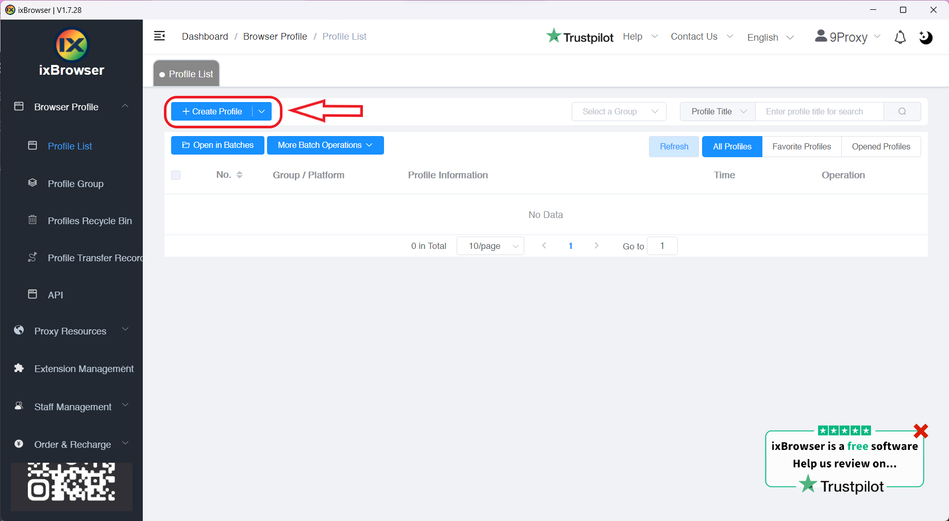
Step 6: At the main interface of the application, select "Create Profile".
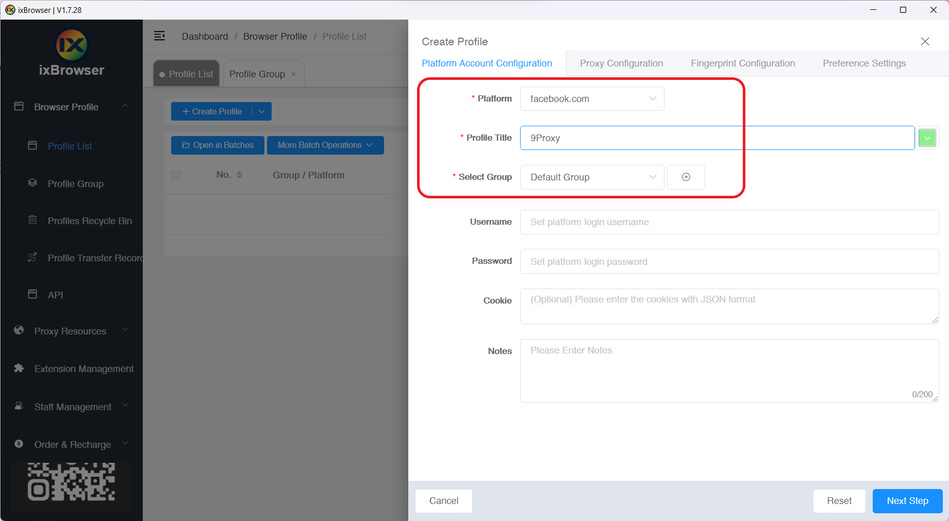
Step 7: Select and fill in important information such as Platform, Profile Title, …
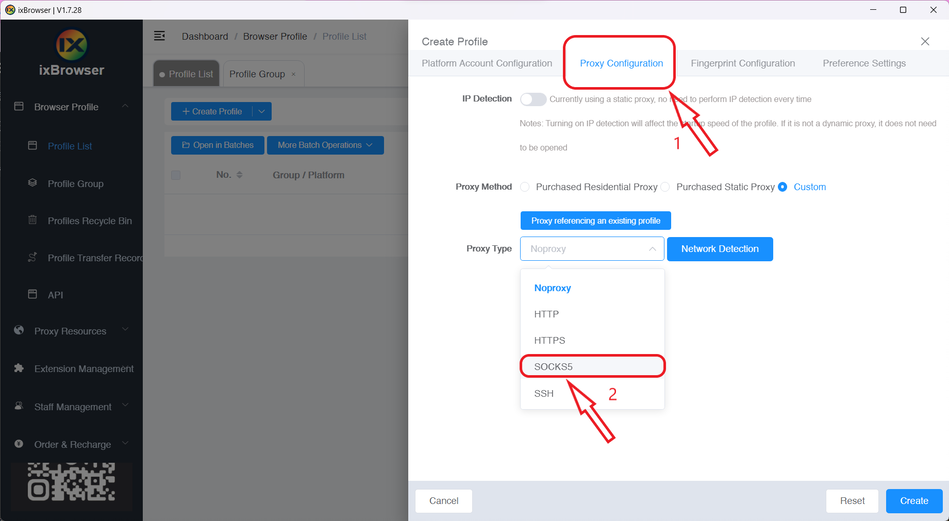
Step 8: Go to the "Proxy Configuration" tab, select the proxy type as SOCKS5.
Step 9: Paste the copied proxy, click "Proxy Detection" to test and click "Create" to complete.
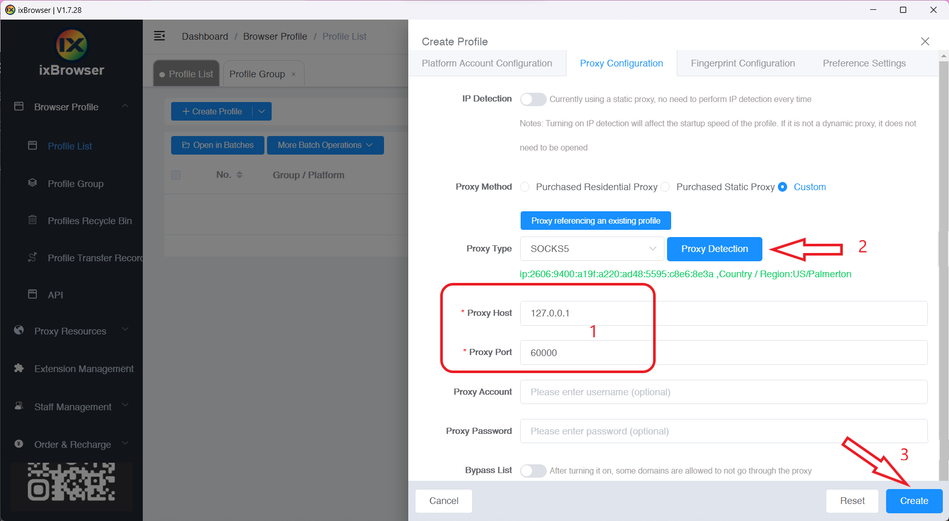
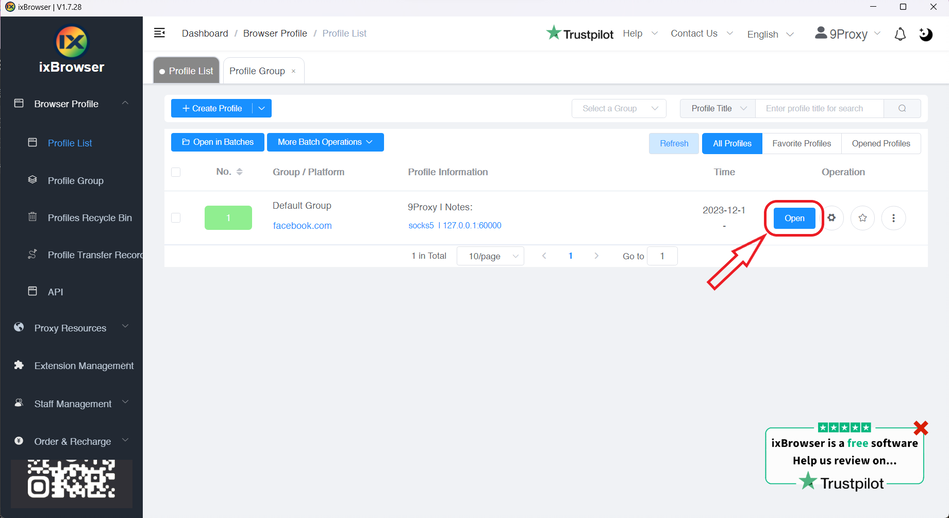
Step 10: Click "Open" to start running.
9Proxy
9Proxy offers a premium proxy service with over 20 million clean, non-blacklisted residential IPs from more than 90 countries, ensuring fast, secure, and highly anonymous browsing via HTTP/HTTPS and SOCKS5. Our unique pool offers unbeatable prices starting at $0.025/IP, alongside a distinctive proxy replacement policy and a "Today List" feature for optimal utility. Complemented by round-the-clock technical support, 9Proxy is the go-to solution for affordable and reliable proxy needs.
How to set up 9Proxy with ixBrowser
Step 1: Download, launch the 9Proxy application and log in to your account.
Step 2: You fill in important information fields such as Country, State, ... and click on the magnifying glass icon next to search.

Step 3: Right click on the proxy you selected from the list, select “Port Forwarding To Proxy”, select the Port number (e.g. 60000) and click “Port Forwarding List” for more details about the proxy you just selected.

Step 4: Copy the proxy to prepare for installation.

Step 5: Launch the ixBrowser and log in to your account.
Step 6: At the main interface of the application, select "Create Profile".

Step 7: Select and fill in important information such as Platform, Profile Title, …

Step 8: Go to the "Proxy Configuration" tab, select the proxy type as SOCKS5.

Step 9: Paste the copied proxy, click "Proxy Detection" to test and click "Create" to complete.

Step 10: Click "Open" to start running.


December 25 2024
How to set up kookeey with ixBrowser(如何在ixBrowser中配置kookeey代理)
What is
kookeey is a global premium proxy provider, delivering high-quality static IPs from 41 countries, also offering 47M+ rotating residential IPs all over the world.
With the big-data capabilities and core algorithms based on our comprehensive IP pool retention, we will empower your business by customizing the clean and dedicated IP proxies perfectly adapt to your work scenario.
We offers three types of proxy products: Static Residential Proxies, Datacenter proxies, and Residential Proxies.
Static Residential Proxies is a network directly connected to local ISPs, offering more refined human-like attributes. These IPs are identified as non-hosted organization or household IPs.
Datacenter proxies are configured through data center networks, providing faster connection speeds and higher stability, with IPs marked as data center IPs.
Residential Proxies come with a pool of over 47M+ global IPs, offering a 100% exclusive IP pool model, with the ability to switch IPs up to 24 hours for maximum privacy and flexibility.
kookeey 是全球领先的代理IP服务商,提供来自41个国家/地区的高质量静态IP,还在全球范围内提供超过4700万个轮转住宅IP。
致力于通过业务大数据积累和IP库留存核心算法技术,来为您提供特定应用场景下的高端独享纯净IP,赋能企业出海探索。
kookeey提供三种类型的代理产品:静态数据中心代理、静态住宅代理、动态住宅代理
静态住宅ISP代理,是与本地运营商直连的网络,具有更完善的真人属性,IP信息标记为非主机商的机构/家庭IP。
静态数据中心代理,是通过机房网络配置的代理线路,具有更快的连接速度和更高的稳定性,IP信息标记为机房IP。
动态住宅代理,拥有4700万全球IP池,100%独享IP池模式,最高支持24小时IP切换。

How to setup kookeey with ixBrowser?(如何在ixBrowser中配置kookeey代理)
Step 1: register an account, download and log in to

Step 2: click “Create Profile”, select platform and group, enter profile title, and click “Next Step”;(步骤2:点击“创建窗口”,选择平台及分组,填写窗口名称并点击下一步)

Step 3: before we configure the proxy, we need to first go to kookeey dashboard to get proxy info;(步骤3:在我们配置代理之前,我们需要先在kookeey的仪表盘中获取代理信息)
In the dashboard, we use static ISP proxy as an example, first we can go to Static ISP > Buy ISP Proxy, filling the information on the page and click Confirm and Purchase;(在仪表盘页面中,我们以静态住宅代理为例,我们首先可以前往静态住宅代理>购买静态住宅代理,按要求填入所需信息并点击购买)

After purchasing, go to My Proxies page, copy the proxy information;(在购买完成之后,点击进入我的代理页面,复制代理信息)

Step 4: Go back to ixBrowser, in Proxy Configuration page, choose the proxy method to “Custom”, and choose proxy type to Socks5, and paste the proxy information into the below box ;(步骤4:返回ixBrowser,在代理配置页面中,选择代理方式为自定义,选择代理类型为Socks5,将Kookeey中的代理信息填入下方的文本框内)

Click proxy detection, once the detection passed, click create to finish the profile creation. Open the profile, and you can start using kookeey’s proxy;(点击代理检测,当检测通过后点击创建按钮完成窗口创建操作,这时打开窗口你就能开始使用kookeey代理了)

kookeey
?(什么是kookeey
)kookeey is a global premium proxy provider, delivering high-quality static IPs from 41 countries, also offering 47M+ rotating residential IPs all over the world.
With the big-data capabilities and core algorithms based on our comprehensive IP pool retention, we will empower your business by customizing the clean and dedicated IP proxies perfectly adapt to your work scenario.
We offers three types of proxy products: Static Residential Proxies, Datacenter proxies, and Residential Proxies.
Static Residential Proxies is a network directly connected to local ISPs, offering more refined human-like attributes. These IPs are identified as non-hosted organization or household IPs.
Datacenter proxies are configured through data center networks, providing faster connection speeds and higher stability, with IPs marked as data center IPs.
Residential Proxies come with a pool of over 47M+ global IPs, offering a 100% exclusive IP pool model, with the ability to switch IPs up to 24 hours for maximum privacy and flexibility.
kookeey 是全球领先的代理IP服务商,提供来自41个国家/地区的高质量静态IP,还在全球范围内提供超过4700万个轮转住宅IP。
致力于通过业务大数据积累和IP库留存核心算法技术,来为您提供特定应用场景下的高端独享纯净IP,赋能企业出海探索。
kookeey提供三种类型的代理产品:静态数据中心代理、静态住宅代理、动态住宅代理
静态住宅ISP代理,是与本地运营商直连的网络,具有更完善的真人属性,IP信息标记为非主机商的机构/家庭IP。
静态数据中心代理,是通过机房网络配置的代理线路,具有更快的连接速度和更高的稳定性,IP信息标记为机房IP。
动态住宅代理,拥有4700万全球IP池,100%独享IP池模式,最高支持24小时IP切换。

How to setup kookeey with ixBrowser?(如何在ixBrowser中配置kookeey代理)
Step 1: register an account, download and log in to
ixBrowser
;(步骤1:注册,下载并登陆ixBrowser
)
Step 2: click “Create Profile”, select platform and group, enter profile title, and click “Next Step”;(步骤2:点击“创建窗口”,选择平台及分组,填写窗口名称并点击下一步)

Step 3: before we configure the proxy, we need to first go to kookeey dashboard to get proxy info;(步骤3:在我们配置代理之前,我们需要先在kookeey的仪表盘中获取代理信息)
In the dashboard, we use static ISP proxy as an example, first we can go to Static ISP > Buy ISP Proxy, filling the information on the page and click Confirm and Purchase;(在仪表盘页面中,我们以静态住宅代理为例,我们首先可以前往静态住宅代理>购买静态住宅代理,按要求填入所需信息并点击购买)

After purchasing, go to My Proxies page, copy the proxy information;(在购买完成之后,点击进入我的代理页面,复制代理信息)

Step 4: Go back to ixBrowser, in Proxy Configuration page, choose the proxy method to “Custom”, and choose proxy type to Socks5, and paste the proxy information into the below box ;(步骤4:返回ixBrowser,在代理配置页面中,选择代理方式为自定义,选择代理类型为Socks5,将Kookeey中的代理信息填入下方的文本框内)

Click proxy detection, once the detection passed, click create to finish the profile creation. Open the profile, and you can start using kookeey’s proxy;(点击代理检测,当检测通过后点击创建按钮完成窗口创建操作,这时打开窗口你就能开始使用kookeey代理了)


December 09 2024
工具推荐:Duoplus云手机
DuoPlus云手机功能全览,助力出海无限可能!
DuoPlus云手机自上线以来,收集用户反馈,结合出海业务开发一系列高效功能,助力用户发挥云手机优势创造无限可能,不断优化用户体验,那么适用于跨境电商的功能有哪些?熟悉以下这些云手机功能,让你的出海业务蒸蒸日上!

· ROOT功能:云手机支持一键ROOT
· 恢复出厂:恢复出厂将清除手机所有数据,但设备信息不会做任何变动
· 分组功能:方便用户和团队管理所有的云手机,对云手机进行分组管理
· 线路选择:可以选择切换云手机视频推流线路,让视频推流更流畅
· 一键新机同时变更代理:在一键新机时可以直接选择变更代理
· 扫码功能:云手机支持上传二维码进行扫描
· 应用管理:支持对应用进行安装、卸载操作
· 直播-OBS推流:支持从电脑的OBS推流软件中读取音、视频流,做到24小时无人值守直播
· 直播-视频播放:支持直接读取云手机内的视频,实现无人值守直播和视频轮播
· 批量控制:1个人也能轻松批量控制多个账号,批量下载/卸载应用、批量视频运营、批量上传文件…

以上就是DuoPlus主要功能的介绍,未来还会持续推出更多功能方便用户操作和管理云手机,满足TikTok、WhatsApp等社媒运营、跨境开店、应用上架、直播带货、商务业务办公沟通等一系列业务,想要了解更多的功能可以查看帮助中心:
点击链
DuoPlus云手机自上线以来,收集用户反馈,结合出海业务开发一系列高效功能,助力用户发挥云手机优势创造无限可能,不断优化用户体验,那么适用于跨境电商的功能有哪些?熟悉以下这些云手机功能,让你的出海业务蒸蒸日上!
· 无限多开:在网页端即可流畅操作,同时无限多开成百上千台云手机
· 批量控制:可满足批量上传文件、批量下载/卸载应用
· 一键换肤:随时随地修改设备硬件参数、代理信息,包括手机代理、GPS、SIM卡、时区语言信息,也可根据IP仿真模拟
· 一键新机:清除数据变成全新云机,升成全新设备参数,降低换机成本
· 团队协作:可添加用户管理员,邀请其它成员共同管理云手机,方便团队协作

· ROOT功能:云手机支持一键ROOT
· 恢复出厂:恢复出厂将清除手机所有数据,但设备信息不会做任何变动
· 分组功能:方便用户和团队管理所有的云手机,对云手机进行分组管理
· 线路选择:可以选择切换云手机视频推流线路,让视频推流更流畅
· 一键新机同时变更代理:在一键新机时可以直接选择变更代理
· 扫码功能:云手机支持上传二维码进行扫描
· 应用管理:支持对应用进行安装、卸载操作
· 直播-OBS推流:支持从电脑的OBS推流软件中读取音、视频流,做到24小时无人值守直播
· 直播-视频播放:支持直接读取云手机内的视频,实现无人值守直播和视频轮播
· 批量控制:1个人也能轻松批量控制多个账号,批量下载/卸载应用、批量视频运营、批量上传文件…

以上就是DuoPlus主要功能的介绍,未来还会持续推出更多功能方便用户操作和管理云手机,满足TikTok、WhatsApp等社媒运营、跨境开店、应用上架、直播带货、商务业务办公沟通等一系列业务,想要了解更多的功能可以查看帮助中心:
https://help.duoplus.cn/docs/pLyhXo,查看云手机操作指南。
点击链
